In this blog post, we will learn How to use Do until in power automate? ,How to set up conditions and configure Do until limits, and also we will discuss
- Power Automate do until advanced mode
- do until and delay power automate
- do until change limits power automate
- power automate do until change timeout
- Do until Multiple conditions with advanced mode
What is Do until loop in Power Automate?
Some times while we using Power Automate, we need to repeat certain steps until a condition is met. The condition that we use in the Do until loop is checked at the end of each loop execution, so the actions within the Do Until loop are always executed at least once.
So we can say that : ” Power Automata’s Do Until control is a loop that forces an action until a certain condition is met “.
How to add Do until control?
In these steps we will discuss Adding a Do until Loop In Power Automate
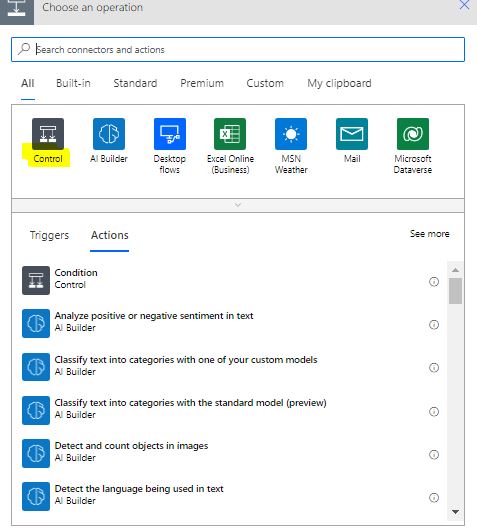
- Add action to your flow and choose Control or you can search directly for do until
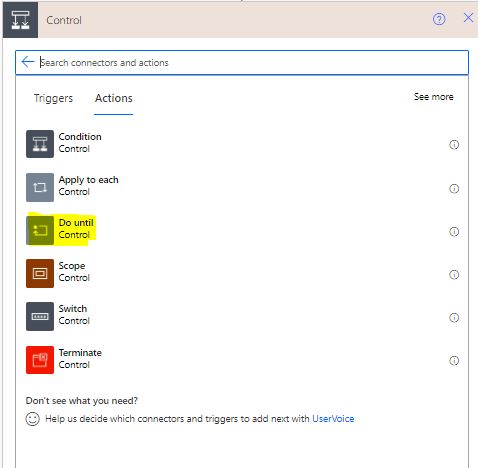
- Choose Do until from the list of control actions that will appear to you
- Add the condition to your Do until loop in Power Automate in which you want to execute loop until this condition is met.
The first value is the actual value that we will compare, then comparison type ex: do until your actual value is greater than the second value ,etc. there are many comparisons as you see in the bellow pic, then the second value that we will compare our value with. the loop will be executed till the condition is met. You can Execute one or more action inside the Do until control
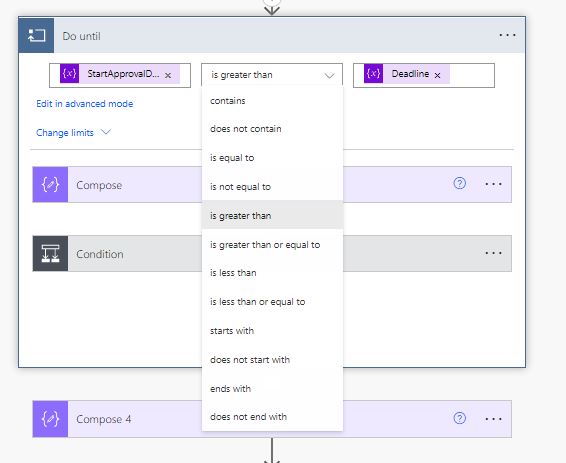
This is How to use Do until in power automate
Power Automate Do until limits
In Power Automate Do until loop you can find Change limits, So let’s know here what is power automate do until change limits? and what is Do until power automate count and timeout
Power Automate Do until limits help your Do until loop to stop the execution even if your condition is not met. as sometimes the condition of your Do until is never met. So in order not to go in infinite loop there is limits “no of iteration that you can set in your loop”.
Do until power automate count
To change the limits click on change limits, By default you can find 60 in the do until count. Count limits the max number of iterations of the Do until loop. It may end earlier, in case the condition of the Do until is reached before this count number.

Do until and delay power automate
Ex1:Suppose you set time for PT1H and set count 60 with delay 1 min. it means your loop will run once in each minute until condition match. if condition does not match it will come out of the loop in 1hr with 60 rounds.
Ex2:Let us also change the delay to 2 minutes for this scenario, After the test run completes this time, we can see that there have been only 30 iterations and that the duration of execution of the Do Until loop is 60 minutes.
So you have to be care about how to use do until in power automate with delay
Please be aware that the maximum duration of a flow is 30 days and also make sure that your timeout under ‘Change limits’ fits your requirements.
Ex: if you put 2 in count then the iteration will end in the 3rd loop. and so on.
Power Automate do until timeout settings
As you see in the above image there is also Timeout with value PT1H , So what is power automate do until limits pt1h?
- The timeout setting specifies the maximum amount of time the Do Until loop will wait for the given condition.
- pt1h is the default value of the time out
- P stands for period.
- T stands for time.
- H stands for hour.
Do until max Time out is 30 days that is P30D in that 30 days it has max count of 5000.
| PT3H | 3 hours |
| PT17M | 17 minutes |
The capital letters P, Y, M, W, D, T, H, M, and S are designators for each of the date and time elements and are not replaced.
- P is the duration designator (for period) placed at the start of the duration representation.
- Y is the year designator that follows the value for the number of calendar years.
- M is the month designator that follows the value for the number of calendar months.
- W is the week designator that follows the value for the number of weeks.
- D is the day designator that follows the value for the number of calendar days.
- T is the time designator that precedes the time components of the representation.
- H is the hour designator that follows the value for the number of hours.
- M is the minute designator that follows the value for the number of minutes.
- S is the second designator that follows the value for the number of seconds. for more details check here.
This is how to use do until in power automate and set count and timeout settings
Power Automate do until advanced mode
We can see an option ‘Edit in advanced mode’ in the Power Automate do until action, which allows us to edit the conditional expression in advanced mode.
and Click on Edit in Basic mode to get back to basic mode.
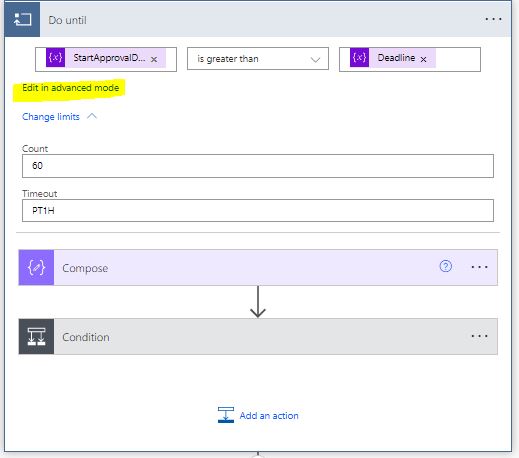
We can see the condition in the form of an expression by clicking on Edit in advanced mode link.
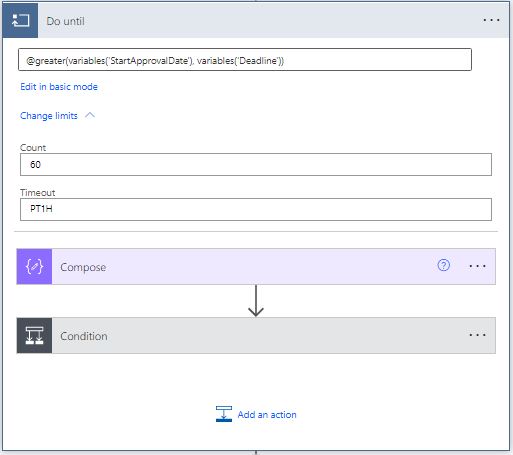
Do until Multiple conditions with advanced mode
how to use do until in power automate with Multiple conditions ? is it possible?
Yes it is possible to use Multiple conditions with advanced mode in power automate do until. Within advanced mode you can formulate complex expressions with ‘or’ and ‘and’.
@and(greater(variables('StartApprovalDate'), variables('Deadline')),less(variables('StartApprovalDate'), variables('Deadline')))Conclusion
In this post we discuss how to use do until in power automate and find that the Do Until loop is useful in scenarios when a certain set of actions have to be repeated, while waiting for a certain value to change.
See Also
- How Power Automate Add Working Days To Date?
- How Power Automate Exclude Weekends And Holidays Between Dates?
- How To Format Date In Power Automate?
- Power Automate Add Days To Date
- How PowerApps Submit Multiple Forms To SharePoint List?
- How PowerApps Add Business Days To Date Excludes Weekends And Holidays?
- Nested Collection In PowerApps :3 Level
- How To Use PowerApps DateDiff Function?
- PowerApps Parse JSON Example
- How To Use Switch Function In PowerApps?
- PowerApps Lookup Function Examples : Complete Tutorial
Join us
- Subscribe to Power Platform Geeks.
- Register to Saudi Arabia Power Platform User Group.
Need Help
- Have a related question? Please ask it at deBUG.to Community.


