In this blog Post, We will export Power Apps To Excel Using Power Automate. And we will learn How to Export any type of data “Gallery /Data table/Collection/Datasource” from Power Apps to Excel.
Export Power Apps To Excel
I have a Power Apps app (Financial App ) that works on data source “any type off data source”, and I want to export the displayed data that the user search from the Power Apps screen to Excel file, you can export the displayed data from the Data table, gallery, collection and any data that you want to display in excel.
We will cover the following :
- Export data from gallery to excel in PowerApps
- Export data from data table to excel in PowerApps
how to export data from PowerApps to excel?
The ability to rapidly extract and analyze data is essential in today’s corporate environment. Microsoft PowerApps, a powerful low-code platform, empowers users to create customized applications without extensive programming knowledge. One common requirement is exporting data from PowerApps to Excel for advanced analysis, reporting, and collaboration. This step-by-step tutorial will show you how to easily export data from PowerApps to Excel, enhancing the way you manage data and make decisions.
In this scenario we will use Power Automate to export data from PowerApps to Excel.
Before diving into the export process, design your PowerApps and prepare the data that you want to export “You can export data from Gallery/ data table to excel in PowerApps with the following method. This could be information from SharePoint lists, SQL databases, or other data sources.
Step1: Transform data to JSON in PowerApps
We need a method to send data from the Data table, gallery, Collection “or the data from any source” from Power Apps to a Flow in Power Automate So that we can get ready to create the Flow according to this data, we’ll need to construct a sample of the JSON as shown bellow to use inside the Power Automate flow to create the file.

Generate JSON sample
In PowerApps, you can transform data to JSON format using the JSON() function. Converting data to JSON allows you to structure and transmit data in a standardized way.
Ensure you have the data that you want to transform to JSON available in your PowerApps. This could be data from a SharePoint list, SQL database, or any other data source
Within your PowerApps, you can use the JSON() function to transform your data to JSON format. The syntax is: JSON(data)
Here’s how you can transform data to JSON in PowerApps:
- Create new screen in your Power Apps , add button and label controls.
- In the OnSelect property of the button write the formula to generate the JSON sample.
You only need to get sample of the data so I use the FirstN function to get the first 2 record as a sample data to use inside parse Json action in Power Automate.
Set(
    varJSONFinancial,
    JSON(
        ShowColumns(
            FirstN(
                Financal,
                2
            ),
            "Title",
            "field_Country",
            "field_Product",
            "field_Discount_x0020_Band",
            "field_Units_x0020_Sold",
            "field_Manufacturing_x0020_Price",
            "field_Gross_x0020_Sales",
            "field_Discounts",
            "field__x0020_Sales"
        ),
        JSONFormat.IndentFour
    )
)- On the text property of the label write
varJSONFinancial
- Run the app and click the button , and it will generate the JSON code in the label and you can copy .
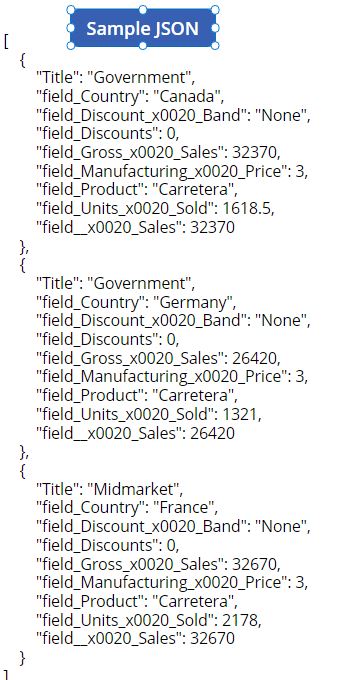
Step2: Power Automate power automate create excel table from json
Now it is time to create the flow to export data to excel from PowerApps using Power Automate.
Create a Flow in Power Automate to export PowerApps Data to excel
- From the Power Automate icon in your power Apps app you can create a new flow tat will trigger the PowerApps. or you can create an instant flow from power automate and select PowerApps to be the trigger of your flow.
- If you want to create custom columns names inside your file , Add Parse JSON action and in the Content select to Ask PowerApps from the dynamic content , to get the data that you want to export from PowerApps to the excel file, and on the schema click Generate from Sample and copy the sample JSON data that we displayed before in the label in your PowerApps app.

This step will use in creating CSV table if you will create automatic columns skip the parse JSON step
- Add Create CSV table and choose Custom and create your column ” If you will use the same fields name keep the columns property to Automatic” if not choose custom and create your custom columns as the following
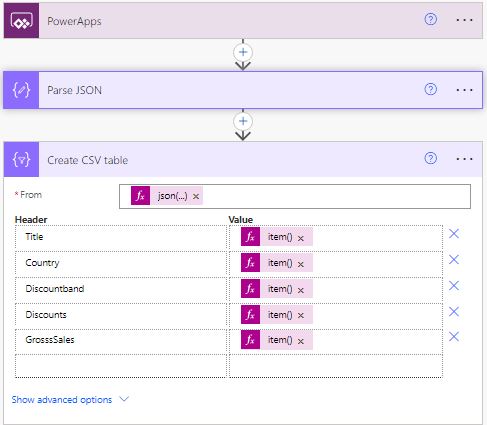
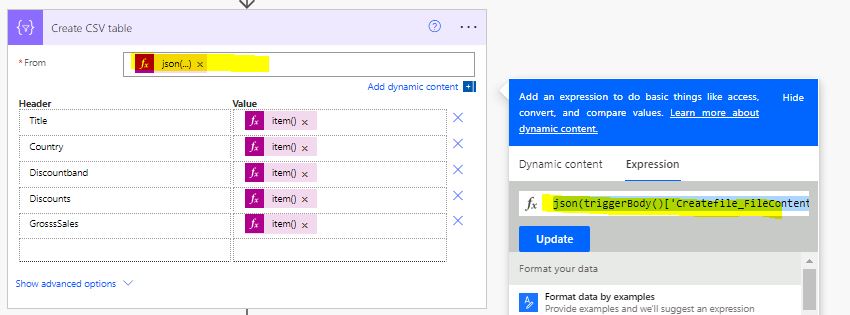
In the From property we will use the json function to get the json data the we pass to the flow from the PowerApps gallery , data table, Collection or any source
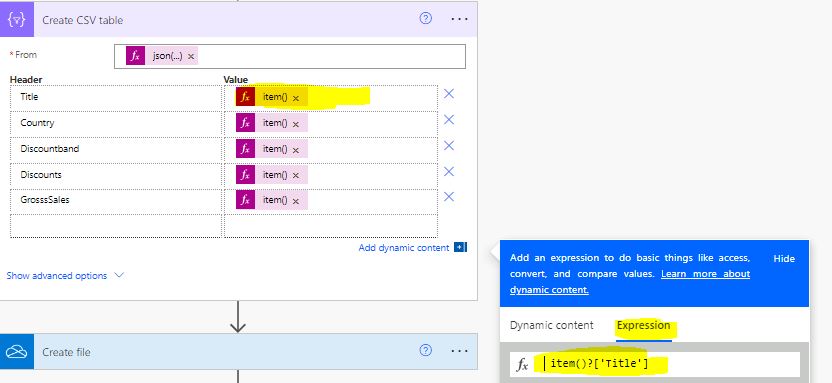
In the Columns Property Choose Custom and insert you custom columns headers.
To correctly extract name of column from Json schema if the columns property not appear directly in the Json Action , You can use item()?[‘Your Column’] to get the map the CSV custom table with the Json Coulmns
Add Excel Actions: In your flow, add the necessary actions to create an Excel file and populate it with your data.
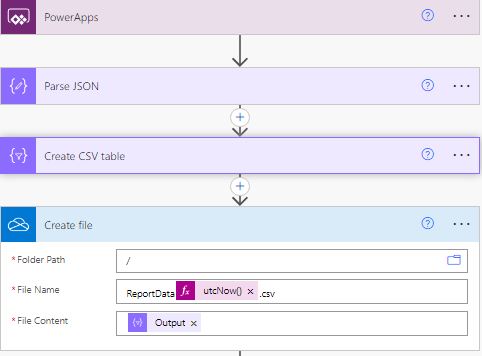
- Create CSV file from the output of the Create CSV Table step
I create the file with dynamic name including the time now
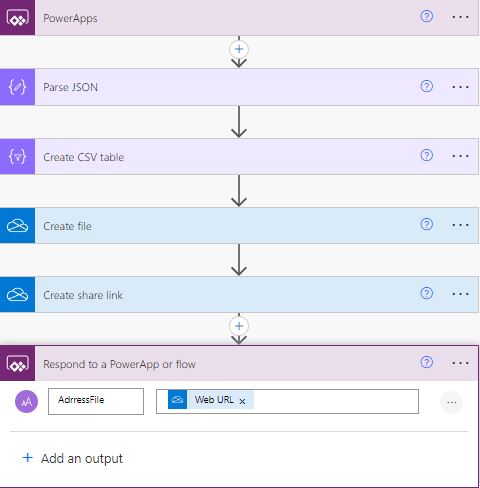
- Add Create share link action

- Add Respond to PowerApps or Flow action and send the web URL to PowerApps to download it
- Save your flow
- Add the flow to PowerApps
- In PowerApps run your flow and download the excel file using the function download and get the value of property “addressfile” of the Respond to PowerApps or Flow action to get the link of the file that you want to Download.
PowerApps export gallery to excel
In the following example we will learn how to export the displayed data from the gallery t excel file “the data is the search data that appear in the gallery”
Set(varJsonData,JSON(ShowColumns(Gallery3.AllItems,"Title","field_Country","field_Discount_x0020_Band","field_Discounts","field_Gross_x0020_Sales","field_Manufacturing_x0020_Price","field_Product", "field_Units_x0020_Sold","field__x0020_Sales")));Download( ReportDataFlow.Run(varJsonData).adrressfile)Now the file is created in your OneDrive and downloaded from PowerApps

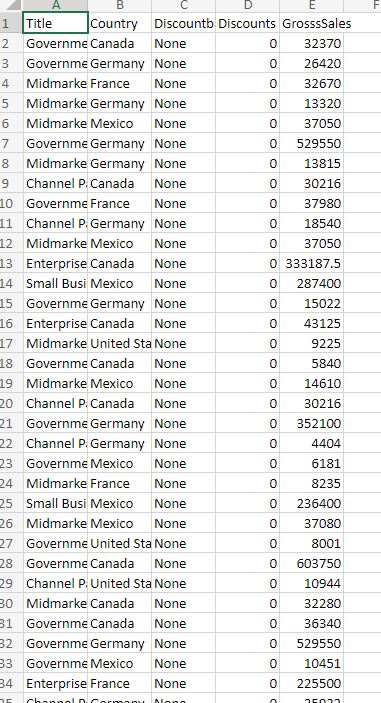
This is How to Export Power Apps To Excel.
Conclusion
In conclusion, exporting data from PowerApps to Excel using CSV files is a valuable feature that provides a practical and versatile means of transferring data while maintaining compatibility and simplicity. It’s particularly useful when you require a quick and reliable method to share and analyze data between PowerApps and Excel.
The method that we learned above is suitable to any type of DataSource and will help us to
- Export data from gallery to excel in PowerApps
- Export data from data table to excel in PowerApps
See Also
- How To Format Text In PowerApps? PowerApps Convert Text To Other Data Types
- Alternate Row Color In Gallery PowerApps: Simplest Way
- Check If PowerApps Contains Substring
- PowerApps If Statement And Nested If With Example
- Environment Variable In Power Platform With Examples
- Model Driven App With SharePoint Data Source
- PowerApps Get Day Of Week Date
Join us
- Subscribe to Power Platform Geeks.


Hi I am stuck after saving the flow. do I put the name of my flow.Run on the button? Help please.
Yes call the flow in any place or from any control you want