Automating repetitive tasks can save time and reduce errors. One such task is processing Excel files uploaded to SharePoint. With Power Automate, you can automatically read an Excel file, verify its structure, check for specific columns, and extract the necessary data.
This guide will allow you to read, verify, and extract data from Excel files as soon as they are uploaded to SharePoint, we will guide you through the steps to set up an automated flow that checks for tables, verifies specific columns, and extracts data from an Excel file.

Step-by-Step Guide to Automate Excel Data Processing
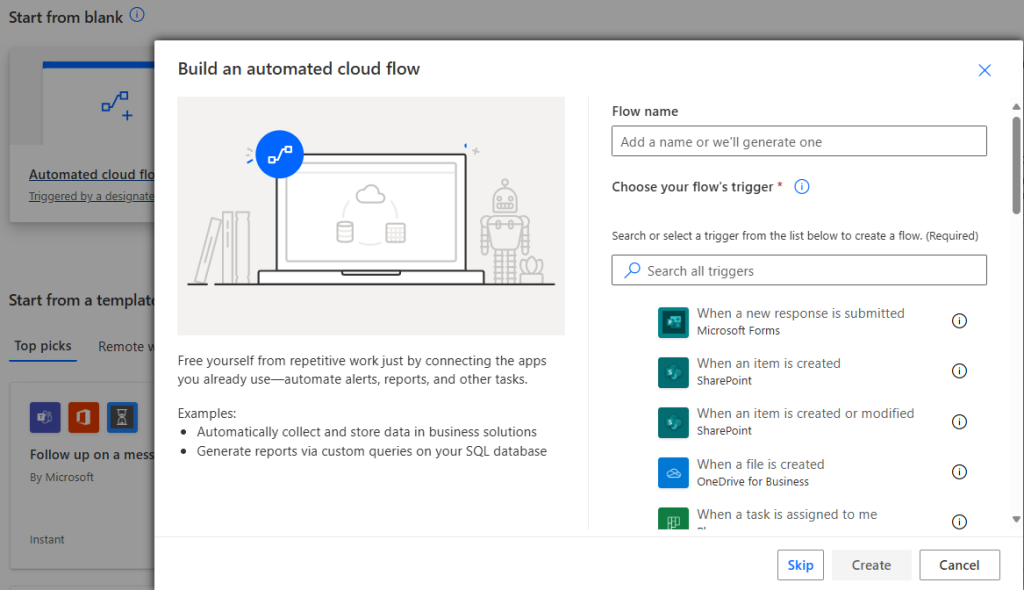
First Create an automated cloud flow

1. Set Up the Trigger: When a File is Created in SharePoint
Trigger the automation when a file is uploaded to SharePoint. You can use the “When a file is created (properties only)”
- Site Adrees: select your site that contains the document library
- Library Name: choose the library to which you will upload the file.
2. Power Automate how to check tables?
To work with the data inside the Excel file, you need to identify the tables in the Excel file. The “List tables” action in the Excel Online (Business) connector will give you the list of tables within the Excel file.
So add the Get tables action after the trigger and complete the following properties.
- Location: Select the SharePoint site location that contains the document library.
- Document library: Select the library to which you will upload the file.
- File: select the identifier property from the trigger

3. Power Automate return Excel Columns in the Table
In this step, we will verify if the table contains the expected columns or not. so first we will need to get 1 row at least from the Excel table to verify the columns that we need to search for.
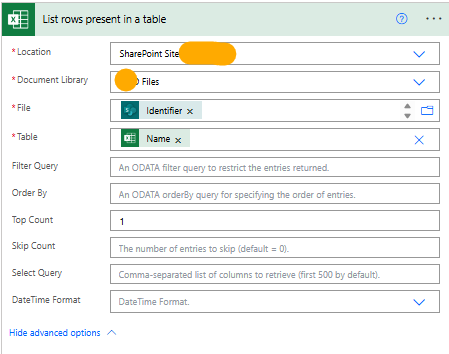
- Use the “List rows present in a table” action to retrieve the rows of data from the identified table. this will generate for each loop, the Apply to each: will loop through the list of tables from the Get tables action.
Fill in the following properties:
- Location: Select the SharePoint site location that contains the document library.
- Document Library: Select the library to which you will upload the file.
- Table: Make it dynamic to be the Name property from the Get tables action, this will get the table name dynamically from the Excel file.
- Top Count: 1 We just need to get 1 row of data to verify the the columns

4. Check for Specific Columns Using the Condition
Power Automate how to check tables columns
In the Condition action, you will compare the column names from the first row of the table. Use the contains() function in your condition to check if a column name exists in the list of column headers.
we will use the following code to convert the output of the previous action to a string and check if it contains the specific name or not.
string(body('List_rows_present_in_a_table'))If there are more columns to check, you can extend the condition with additional contains() functions. This method assumes that your Excel file is structured properly with headers in the first row.


If the condition is true (i.e., the expected columns are found), and now you can do what you want. otherwise, you can notify the user that the Excel file has the wrong structure.
Conclusion
By automating the process of reading, verifying, and extracting data from Excel files uploaded to SharePoint, you can save time and improve the efficiency of your workflows. Power Automate makes it easy to create a flow that checks if the uploaded file matches your expected structure (based on columns) and extracts the necessary data for further processing.
See Also
- How To Use Pdf Function In PowerApps?
- Working With PowerApps Nested Gallery Control
- How Power Automate Create Excel Table Dynamically? | Power Automate
- How To Make A Csv File Utf-8 Encoded? | Power Automate
- How To Format Text In PowerApps? PowerApps Convert Text To Other Data Types
- Alternate Row Color In Gallery PowerApps: Simplest Way
- Check If PowerApps Contains Substring
- PowerApps If Statement And Nested If With Example
- Model Driven App With SharePoint Data Source
- PowerApps Get Day Of Week Date
Join us
- Subscribe Power Platform Geeks.


